If your organization is Utilizing Position Management and running the POS006A.sqr, then you have seen the way PeopleSoft populates the ORGCODE field on Position Data. This field is only populated for the current effective dated row on the positions.
So if you wanted to select the current effective dated row for a position, you could simply do it like this:
SELECT * FROM PS_POSITION_DATA X WHERE X.POSITION_NBR = ? AND X.ORGCODE > ' '
But that is not the true intent of this field, this field is used to store the organizational value for creating an Org Chart, but how can you use this field to your advantage?
Well if you run the POS006A.SQR daily then you could use this field to select all the positions that report directly and indirectly to a position. Without using a recursive query. You could still use a recursive query, as they are kind of fun. But why would you...
Try writing a query like this:
SELECT * FROM PS_POSITION_DATA WHERE ORGCODE LIKE (SELECT ORGCODE||'%' FROM PS_POSITION_DATA X WHERE X.POSITION_NBR = ? AND X.ORGCODE > ' ') ORDER BY ORGCODE;
This will return the Position number in the ? and all the positions that report directly up through it.
Monday, July 29, 2013
HTTP Test Service
I am working on integrating PeopleSoft HCM to Kenexa, a 3rd Party recruiting system, via IBM's DataPower ESB Component. Since I have to translate the message in DataPower, I thought it might be useful to create a Test Service in IB that would generate a hard coded response using an HTML object and send me an email of the xml that is received. This would allow me to test my response handling and see my XLST results coming out of DataPower.
The handler was pretty simple.
method OnRequest
/+ &_MSG as Message +/
/+ Returns Message +/
/+ Extends/implements PS_PT:Integration:IRequestHandler.OnRequest +/
/* Variable Declaration */
Local Message &msgReply;
Local XmlDoc &ResponseXML, &XML_MESSAGE;
&msgReply = CreateMessage(Operation.ZZ_TEST_SERVICE, %IntBroker_Response);
&XML_MESSAGE = &_MSG.GetXmlDoc();
SendMail(0, "kevin.weaver@umb.com", "", "", "HCMSND", &XML_MESSAGE.GenXmlString());
&ResponseXML = CreateXmlDoc(GetHTMLText(HTML.ZZ_TEST_SERVICE));
&msgReply.SetXmlDoc(&ResponseXML);
Return &msgReply;
end-method;
The problem I was having was Integration broker was not calling my handler and was responding back with this error.
These Headers where impacting how the HttpListeningConnector was processing the message and preventing it from ever getting to my Handler. Luckily, DataPower has the option to suppress headers and prevent them from being sent to their end point. After, I suppressed these headers I was able to test my XLST and my logic to handle Kenexa responses.
The handler was pretty simple.
method OnRequest
/+ &_MSG as Message +/
/+ Returns Message +/
/+ Extends/implements PS_PT:Integration:IRequestHandler.OnRequest +/
/* Variable Declaration */
Local Message &msgReply;
Local XmlDoc &ResponseXML, &XML_MESSAGE;
&msgReply = CreateMessage(Operation.ZZ_TEST_SERVICE, %IntBroker_Response);
&XML_MESSAGE = &_MSG.GetXmlDoc();
SendMail(0, "kevin.weaver@umb.com", "", "", "HCMSND", &XML_MESSAGE.GenXmlString());
&ResponseXML = CreateXmlDoc(GetHTMLText(HTML.ZZ_TEST_SERVICE));
&msgReply.SetXmlDoc(&ResponseXML);
Return &msgReply;
end-method;
The problem I was having was Integration broker was not calling my handler and was responding back with this error.
<?xml version="1.0"?>
<IBResponse
type="error"><DefaultTitle>Integration Broker
Response</DefaultTitle><StatusCode>20</StatusCode><MessageSet>158</MessageSet><MessageID>10733</MessageID><DefaultMessage>
Integration Gateway failed while processing the message.
</DefaultMessage><MessageParameters><Parameter>NodeName:
ZZ_ESB Is Not Default Local
Node!!!</Parameter></MessageParameters></IBResponse>
So I went to my msgLog.html and discovered that Integration Broker was adding some HTTP Headers to the message.
Headers
NonRepudiation : [False]
TransactionID : [47956670-f86f-11e2-872e-a426c6fef051]
DataChunkCount : [1]
To : [ZZ_ESB]
Content-Type : [text/xml; charset=utf-8]
MessageType : [sync]
From : [PSFT_DEV]
MessageName : [ZZ_BR_SEND.v1]
DataChunk : [1]
version : [v1]
NonRepudiation : [False]
TransactionID : [47956670-f86f-11e2-872e-a426c6fef051]
DataChunkCount : [1]
To : [ZZ_ESB]
Content-Type : [text/xml; charset=utf-8]
MessageType : [sync]
From : [PSFT_DEV]
MessageName : [ZZ_BR_SEND.v1]
DataChunk : [1]
version : [v1]
These Headers where impacting how the HttpListeningConnector was processing the message and preventing it from ever getting to my Handler. Luckily, DataPower has the option to suppress headers and prevent them from being sent to their end point. After, I suppressed these headers I was able to test my XLST and my logic to handle Kenexa responses.
Friday, July 26, 2013
Salary Planning Query -Managing Exceptions
Delivered Salary Planning defaults the Salary Admin Plan from the Location and the Grade from the JobCode, but the Job record allows you to override these defaults by allow you to change either the Salary Admin Plan or the Grade. So how can you track who has been overridden? You can create a query based on the SQL below to manager your Salary Planning Exceptions.
SELECT A.EMPLID, A.EMPL_RCD, A.POSITION_NBR, A.SAL_ADMIN_PLAN, A.GRADE, CASE B.SAL_ADMIN_PLAN WHEN ' ' THEN C.SAL_ADMIN_PLAN ELSE B.SAL_ADMIN_PLAN END, C.GRADE
FROM PS_CURRENT_JOB A, PS_LOCATION_TBL B, PS_JOBCODE_TBL C
WHERE B.LOCATION = A.LOCATION
AND B.EFFDT =
(SELECT MAX(B_ED.EFFDT) FROM PS_LOCATION_TBL B_ED
WHERE B.SETID = B_ED.SETID
AND B.LOCATION = B_ED.LOCATION
AND B_ED.EFFDT <= SYSDATE)
AND A.SETID_LOCATION = B.SETID
AND C.JOBCODE = A.JOBCODE
AND C.EFFDT =
(SELECT MAX(C_ED.EFFDT) FROM PS_JOBCODE_TBL C_ED
WHERE C.SETID = C_ED.SETID
AND C.JOBCODE = C_ED.JOBCODE
AND C_ED.EFFDT <= SYSDATE)
AND A.SETID_JOBCODE = C.SETID
AND ( A.SAL_ADMIN_PLAN <> CASE B.SAL_ADMIN_PLAN WHEN ' ' THEN C.SAL_ADMIN_PLAN ELSE B.SAL_ADMIN_PLAN END
OR A.GRADE <> C.GRADE)
AND A.HR_STATUS = 'A'
Enjoy!
Batch Publish for HR_ACCTG_LINE
We use the delivered PAYGL01-(Payroll GL Interface - Non CA) to send over our payroll GL data to PeopleSoft FIN. The mechanism for delivering this data is the PAYROLL_ACCTG_TRANSACTION Service Operation. But the PAYGL01 process does not send this data immediatly after generating it. Rather is Stores it in the HR_ACCTG_LINE with a process instance from the SQR that generated it.
I suppose PeopleSoft does this, just in case the Payroll Manager wants to review the data, prior to posting it in GL. Once the Payroll Manager is ready to send this data, he simply runs AE.EOP_PUBLISHM -(Manual Batch Publish) that uses the Process Instance to send the accounting lines to FIN .
But suppose you wanted to create more GL Entries from PeopleSoft that don't have anything to do with Payroll Earnings? How can you create these GL Entries and utilize this methodology to get them Posted in GL?
Well it is pretty simple, All you need to do is create a process to Populate the HR_ACCTG_LINE table and populate the fields you need for your GL Entries, be sure to populate the process instance column! Once you have inserted all the accounting Lines, create a batch publish rules parameter record in the EO_MSGBATPRM. Below is a code snipit:
After we have generated the Accounting Lines:
&batch_publish_parms = CreateRecord(Record.EO_MSGBATPRM);
&batch_publish_parms.PROCESS_INSTANCE.value = ZZ_INTF_OUT_AET.PROCESS_INSTANCE.Value;
&batch_publish_parms.JOBINSTANCE.value = ZZ_INTF_OUT_AET.PROCESS_INSTANCE.Value;
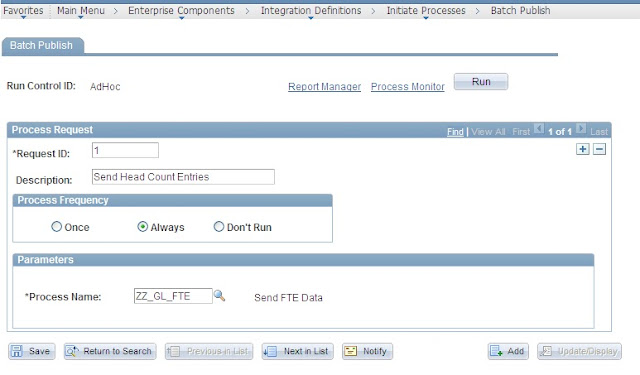
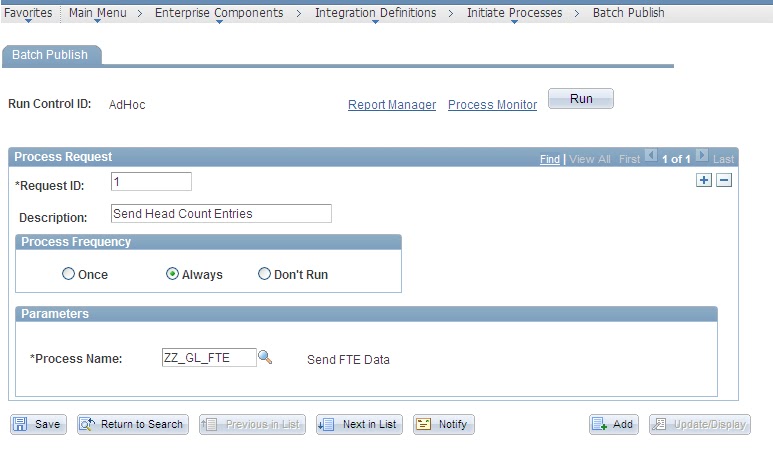
&batch_publish_parms.PROCESS_NAME.value = "ZZ_GL_FTE";
&batch_publish_parms.PROCESS_STATUS.VALUE = "N";
&batch_publish_parms.BATCH_CLEANUP_FLG.VALUE = "U";
&batch_publish_parms.DATETIME_STAMP.VALUE = %Datetime;
&insert.Execute(&batch_publish_parms);
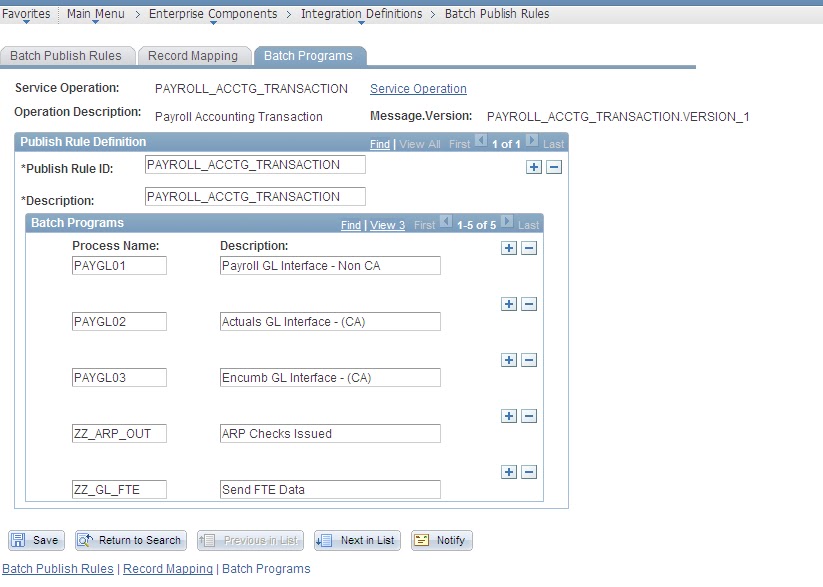
Now Just Define your Batch Process on the PAYROLL_ACCTG_TRANSACTION Batch Publish Rule:

And run the AE.EOP_PUBLISHM -Manual Batch Publish with your Program Name as the Parameter
 . Your accounting Lines will be published in FIN and ready for the Journal Generator to take over.
I suppose PeopleSoft does this, just in case the Payroll Manager wants to review the data, prior to posting it in GL. Once the Payroll Manager is ready to send this data, he simply runs AE.EOP_PUBLISHM -(Manual Batch Publish) that uses the Process Instance to send the accounting lines to FIN .
But suppose you wanted to create more GL Entries from PeopleSoft that don't have anything to do with Payroll Earnings? How can you create these GL Entries and utilize this methodology to get them Posted in GL?
Well it is pretty simple, All you need to do is create a process to Populate the HR_ACCTG_LINE table and populate the fields you need for your GL Entries, be sure to populate the process instance column! Once you have inserted all the accounting Lines, create a batch publish rules parameter record in the EO_MSGBATPRM. Below is a code snipit:
After we have generated the Accounting Lines:
&batch_publish_parms = CreateRecord(Record.EO_MSGBATPRM);
&batch_publish_parms.PROCESS_INSTANCE.value = ZZ_INTF_OUT_AET.PROCESS_INSTANCE.Value;
&batch_publish_parms.JOBINSTANCE.value = ZZ_INTF_OUT_AET.PROCESS_INSTANCE.Value;
&batch_publish_parms.PROCESS_NAME.value = "ZZ_GL_FTE";
&batch_publish_parms.PROCESS_STATUS.VALUE = "N";
&batch_publish_parms.BATCH_CLEANUP_FLG.VALUE = "U";
&batch_publish_parms.DATETIME_STAMP.VALUE = %Datetime;
&insert.Execute(&batch_publish_parms);
Now Just Define your Batch Process on the PAYROLL_ACCTG_TRANSACTION Batch Publish Rule:
And run the AE.EOP_PUBLISHM -Manual Batch Publish with your Program Name as the Parameter
Wednesday, July 24, 2013
Validating Chartfields Combinations in HCM
We just implemented Combo Edits in PeopleSoft HCM and we had a unique challenge, in that we track Location as a chartfield value and this meant that we would have to map our expenses below the Department ID. So in order to properly map our expenses down to the employee's location we generated expense mapping for every employee at the emplid level!. In order to maintain this data we created a process that compares the current employee's expense mapping to their current job chartfield values and if they were different, then we created a new expense mapping for that employee. The cool thing I found was this HMCF_CHARTFIELDS:CHARTFIELD_COMBINATION Application Package.
This package has a method called ValidateCominationBatchMBU that takes these Inputs:
Accounting Date
Synchronous Call to FMS as Boolean
Rowset based on the Record CF_COMBO_WRK_BU
I used the Sync call to FMS and it worked like a champ! Just remember to Activate the COMBO_CF_EDIT_REQUEST Message in Integration Broker and let Financials Validate all your Combo Edits in HCM. Check out this Package, it has plenty of other great methods that I have not even had time to evaluate.
Tuesday, July 23, 2013
Dynamic Approver User List for AWE
If you ever have a workflow requirement that may require one to many levels of approval for a step, then you should consider using Dynamic Approver User List. Dynamic Approver User List are User List that are defined as Application Packages and the Path for the Approval Process is setup as Dynamic. The example below walks up the supervisor using Oracle's Connect sql and finds the next Approver who has a signing authority.
Below is the Approval Process Setup:

Application Package Code
import EOAW_CORE:DEFN:UserListBase;
class ZZ_ApprUserList extends EOAW_CORE:DEFN:UserListBase
method ZZ_ApprUserList(&rec_ As Record);
method GetUsers(&aryPrevOpr_ As array of string, &thread_ As Record) Returns array of string;
end-class;
method ZZ_ApprUserList
/+ &rec_ as Record +/
%Super = create EOAW_CORE:DEFN:UserListBase(&rec_);
end-method;
method GetUsers
/+ &aryPrevOpr_ as Array of String, +/
/+ &thread_ as Record +/
/+ Returns Array of String +/
/+ Extends/implements EOAW_CORE:DEFN:UserListBase.GetUsers +/
Local array of string &oprid_arr = CreateArrayRept("", 0);
Local string &REQUESTOR, &ORIGIN;
Local number &req_amt, &SIGN_AUTH, &PREV_SIGN_AUTH;
Local string &oprid;
SQLExec("SELECT B.REQUESTOR_ID, B.ORIGIN FROM PS_REQ_HDR B WHERE B.REQ_ID = :1 AND B.BUSINESS_UNIT = :2", &thread_.REQ_ID.Value, &thread_.BUSINESS_UNIT.Value, &REQUESTOR, &ORIGIN);
If &ORIGIN = "DIR" Then
SQLExec("SELECT sum(A.MERCHANDISE_AMT) FROM PS_REQ_LINE A WHERE A.REQ_ID = :1 AND A.BUSINESS_UNIT = :2 ", &thread_.REQ_ID.Value, &thread_.BUSINESS_UNIT.Value, &req_amt);
Local SQL &admin_sql = CreateSQL("select OPRID ,MERCHANDISE_AMT from PS_ZZ_WF_AUTH_VW D START WITH D.OPRID = :1 CONNECT BY PRIOR SUPERVISOR_ID = D.OPRID", &aryPrevOpr_ [1]);
Local number &counter = 0;
While &admin_sql.Fetch(&oprid, &SIGN_AUTH)
&counter = &counter + 1;
If &counter > 1 Then
If &SIGN_AUTH > 0 Then
Break;
End-If;
End-If;
End-While;
SQLExec("SELECT MERCHANDISE_AMT FROM PS_ZZ_WF_AUTH_VW WHERE OPRID = :1", &aryPrevOpr_ [1], &PREV_SIGN_AUTH);
If &aryPrevOpr_ [1] = &REQUESTOR Then
rem the previous approver was the requestor, so we have to have one approver regardless of signing authority
so add this user to the approver array;
&oprid_arr.Push(&oprid);
Else
If &req_amt > &PREV_SIGN_AUTH Then
&oprid_arr.Push(&oprid);
End-If;
End-If;
End-If;
Return &oprid_arr;
end-method;
Things to know.
- All User list extend the EOAW_CORE:DEFN:UserListBase
- Needs to Return an Array of User Ids
- AWE will call this User List until the user list returns an empty array.
Query to select an employee's Work Schedule and PTO (Tested using Oracle DB)
Using my last post of how to breakout an employee's PTO request into durations, we can now use that SQL as a basis of seeing the how picture of the employee's schedule. If we use the employee's assigned schedule and join it to schedule calendar Table, this will break out the employee Time and Labor Schedule by duration. If we go a step further and join the employee's holiday schedule from the job record, then we can account for Holiday's. Now all we need to get a clear picture of the employee's schedule is the PTO Request broken up by duration.
In the SQL below the PS_ZZ_PSFT_PTO is a populated via the sql the previous post.
WITH Schedule ( Emplid, Empl_Rcd, Dur, Wrkday_Id, Daynum, Hol_Descr) AS (
SELECT E.EMPLID
, E.EMPL_RCD
,DUR
, WRKDAY_ID
, DAYNUM
, (
SELECT H.DESCR
FROM PS_HOLIDAY_DATE H
WHERE H.HOLIDAY = DUR
AND H.HOLIDAY_SCHEDULE =A.HOLIDAY_SCHEDULE)
FROM Ps_Sch_Assign E, Ps_Sch_Clnd_Dtl_Vw F, Ps_JOB A
WHERE E.Emplid = A.Emplid
AND E.Empl_Rcd = A.Empl_Rcd
AND A.EFFDT = (
SELECT MAX(A_ED.EFFDT)
FROM PS_JOB A_ED
WHERE A.EMPLID = A_ED.EMPLID
AND A.EMPL_RCD = A_ED.EMPL_RCD
AND A_ED.EFFDT <= SYSDATE)
AND A.EFFSEQ = (
SELECT MAX(A_ES.EFFSEQ)
FROM PS_ZZ_JOB_CUST A_ES
WHERE A.EMPLID = A_ES.EMPLID
AND A.Empl_Rcd = A_Es.Empl_Rcd
AND A.EFFDT = A_ES.EFFDT)
AND E.EFFDT = (
SELECT MAX(E_ED.EFFDT)
FROM PS_SCH_ASSIGN E_ED
WHERE E.EMPLID = E_ED.EMPLID
AND E.EMPL_RCD = E_ED.EMPL_RCD
AND E_ED.EFFDT <= TO_DATE(SYSDATE))
AND F.SETID = E.SETID
AND F.SCH_ADHOC_IND = E.SCH_ADHOC_IND
AND F.SCHEDULE_ID = E.SCHEDULE_ID
AND F.ROTATION_ID = E.ROTATION_ID
AND F.EFFDT = (
SELECT MAX(F_ED.EFFDT)
FROM PS_SCH_CLND_DTL_VW F_ED
WHERE F.SETID = F_ED.SETID
AND F.SCH_ADHOC_IND = F_ED.SCH_ADHOC_IND
AND F.SCHEDULE_ID = F_ED.SCHEDULE_ID
AND F.ROTATION_ID = F_ED.ROTATION_ID
AND F.DUR = F_ED.DUR
AND F.Shiftnum = F_Ed.Shiftnum
AND F_Ed.Effdt <= To_Date(Sysdate)) )
SELECT s.Emplid
, s.Empl_Rcd
, s.Dur
, s.Wrkday_Id
, s.Daynum
, s.Hol_Descr
, P.zz_requested
, P.SCHED_HRS
,to_char(S.DUR
,'dd')
, CASE NVL(HOL_DESCR
,'NULL') WHEN 'NULL' THEN CASE WRKDAY_ID WHEN 'OFF' THEN 'O' ELSE CASE WHEN NVL(ZZ_REQUESTED
,0) > 0 THEN CASE WHEN SCHED_HRS > ZZ_REQUESTED THEN 'P' ELSE 'A' END ELSE 'S' END END ELSE 'H' END
,'<td style="background-color:'||CASE NVL(HOL_DESCR
,'NULL') WHEN 'NULL' THEN CASE WRKDAY_ID WHEN 'OFF' THEN 'WHITE' ELSE CASE WHEN NVL(ZZ_REQUESTED
,0) > 0 THEN CASE WHEN SCHED_HRS > ZZ_REQUESTED THEN 'YELLOW;color:black' ELSE 'RED;color:white' END ELSE 'GREEN;color:white' END END ELSE 'BLUE;color:white;" title="'||replace(HOL_DESCR
,chr(39)
,''')||'' END||'"><div style=''width:30px;height:20;''>'||to_char(S.DUR
,'dd')||'</td>'
,'<td '||CASE NVL(HOL_DESCR
,'NULL') WHEN 'NULL' THEN '' ELSE 'title="'||replace(HOL_DESCR
,chr(39)
,''')||'" ' END || 'style="background-image:url('''
, '</td>'
FROM Schedule S LEFT OUTER JOIN PS_ZZ_PSFT_PTO P ON P.EMPLID = S.EMPLID
And P.Bgn_Dt = S.Dur
ORDER BY s.dur;
Using this Query I created a view and used the SQL to generate the data for an HTML table that allows managers and associates to view their teams schedule. It will even let manager's drill down into indirect reports schedules to view availability of their indirect reports team's.
Cool Absence Query for ORACLE
Absence management stores absence requests in blocks on the GP_ABS_EVENT table, so if you request one week of PTO it will store the entire week on one record using a from and through date. Sometimes you need to have this block of PTO broken up into individual days and you have to take in account the employee's schedule. This is because someone may request two weeks off and that block might include weekends and other non scheduled time and Absence will not include time off in its calculations.
This query takes in account multiple absence takes, since we have a Volunteer Day where employee's can volunteer at a local charity, and usually these places have 4 hour shifts, so the employee will typically take the other half day as PTO, if they so choose.
So I created a view of the Absence Request to sum the end day hours and begin day hours on the absence request. This allows me to see if they are taking part of the day off or the whole day off without worrying about multiple takes, as I want my query to only pull back one duration per day. To do that
This is the ZZ_ABS_EVENT View in the SQL
SELECT A.EMPLID
, A.EMPL_RCD
, A.BGN_DT
, A.ALL_DAYS_IND
, A.END_DT
, SUM(A.END_DAY_HRS)
, SUM(A.BEGIN_DAY_HRS)
FROM Ps_Gp_Abs_event A
WHERE A.VOIDED_IND = 'N'
AND A.MANAGER_APPR_IND = 'Y'
GROUP BY A.EMPLID, A.EMPL_RCD, A.BGN_DT, A.ALL_DAYS_IND, A.END_DT
Here is my SQL to select all approved absence request, broken up by day.
SELECT E.EMPLID
, B.OPRID
, F.Dur
, WRKDAY_ID
, SUM(CASE all_days_ind WHEN 'Y' THEN a.begin_day_hrs ELSE CASE WHEN f.dur = a.bgn_dt THEN DECODE(a.begin_day_hrs
,0
,F.SCHED_HRS
,a.begin_day_hrs) ELSE CASE WHEN a.end_dt = f.dur THEN DECODE(a.end_day_hrs
,0
,F.SCHED_HRS
,a.end_day_hrs) ELSE f.sched_hrs END END END)
, F.Sched_Hrs
FROM PS_SCH_ASSIGN E LEFT OUTER JOIN PS_ZZ_ABS_EVENT A ON A.EMPLID = E.EMPLID AND A.EMPL_RCD = E.EMPL_RCD
, Ps_Sch_Clnd_Dtl_Vw F
, PSOPRDEFN B
WHERE F.DUR BETWEEN A.bgn_Dt AND a.end_dt
AND E.EMPLID = B.EMPLID
AND E.EFFDT = (
SELECT MAX(E_ED.EFFDT)
FROM PS_SCH_ASSIGN E_ED
WHERE E.EMPLID = E_ED.EMPLID
AND E.EMPL_RCD = E_ED.EMPL_RCD
AND E_ED.EFFDT <= to_date(sysdate))
AND F.SETID = E.SETID
AND F.SCH_ADHOC_IND = E.SCH_ADHOC_IND
AND F.SCHEDULE_ID = E.SCHEDULE_ID
AND F.ROTATION_ID = E.ROTATION_ID
AND F.EFFDT = (
SELECT MAX(F_ED.EFFDT)
FROM PS_SCH_CLND_DTL_VW F_ED
WHERE F.SETID = F_ED.SETID
AND F.SCH_ADHOC_IND = F_ED.SCH_ADHOC_IND
AND F.SCHEDULE_ID = F_ED.SCHEDULE_ID
AND F.ROTATION_ID = F_ED.ROTATION_ID
AND F.DUR = F_ED.DUR
AND F.SHIFTNUM = F_ED.SHIFTNUM
AND F_ED.EFFDT <= to_date(sysdate))
AND F.DUR >= A.BGN_DT
AND F.DUR <= A.END_DT
AND F.OFFDAY_IND = 'N'
And A.End_Dt >= To_Date(Sysdate)
group by E.EMPLID, B.OPRID, F.Dur, WRKDAY_ID, F.Sched_Hrs;
Monday, July 22, 2013
Generating Spreadsheets from Peoplesoft Application Engines
In my last post I shared the File Conversion Utility, and inside the project are a couple of nice Easter eggs. But the one I am going to blog about today is how the utility converts a rowset into a XML Spreadsheet 2003. Most of the credit should go to David Vandiver, whose SQR2XLS project inspired me to not just generate spreadsheets in Application Engines, SQR's and WebLibs! But also inspired me to realize I could write and application engine that could parse an XML Spreadsheet and develop a really cool utility that would make my job easier. So back to generating Spreadsheets from application engines.
If you have downloaded the project and installed it in a development environment then check out the Report Step under the Main Section. This is the step that generates the errors in a spreadsheet. Below is the code:
Declare Function GetFileName PeopleCode ZZ_INTFC_FUNCLB.FILENAME FieldFormula;
Declare Function xml_init_file PeopleCode ZZ_XMLLINK.XMLFILE FieldFormula;
Declare Function xml_init_style PeopleCode ZZ_XMLLINK.XMLFILE FieldFormula;
Declare Function xml_init_worksheet PeopleCode ZZ_XMLLINK.XMLFILE FieldFormula;
Declare Function xml_init_col PeopleCode ZZ_XMLLINK.XMLFILE FieldFormula;
Declare Function xml_init_row PeopleCode ZZ_XMLLINK.XMLFILE FieldFormula;
Declare Function xml_cell_char PeopleCode ZZ_XMLLINK.XMLFILE FieldFormula;
Declare Function xml_format_header_or_footer PeopleCode ZZ_XMLLINK.XMLFILE FieldFormula;
Declare Function xml_finalize_worksheet_pagesetup PeopleCode ZZ_XMLLINK.XMLFILE FieldFormula;
Declare Function xml_finalize_worksheet_print PeopleCode ZZ_XMLLINK.XMLFILE FieldFormula;
Declare Function xml_finalize_worksheet_split PeopleCode ZZ_XMLLINK.XMLFILE FieldFormula;
Declare Function xml_finalize_worksheet_allowoptions PeopleCode ZZ_XMLLINK.XMLFILE FieldFormula;
Declare Function xml_finalize_workbook PeopleCode ZZ_XMLLINK.XMLFILE FieldFormula;
Declare Function BUILD_XML_STYLES PeopleCode ZZ_XMLLINK.XMLFILE FieldFormula;
Declare Function ROWSET_TO_CELLS PeopleCode ZZ_XMLLINK.XMLFILE FieldFormula;
Global string &HTMLstring;
Global File &Z_XML_XLS;
Local Record &TAO, &PER_DATA;
Global Rowset &cnv_stg;
Local Rowset &hide_flds, &rpt_flds;
Local SQL &getdata;
Function build_header()
Local number &COL;
&COL = 0;
For &flds = 1 To &rpt_flds.ActiveRowCount
xml_init_col((&COL = &COL + 1), 0, 78.25, 0, 0);
End-For;
xml_init_row(1, 0, 50, 0, "S1");
For &flds = 1 To &rpt_flds.ActiveRowCount
xml_cell_char(&rpt_flds(&flds).ZZ_RPT_FIELDS.FIELDNAME.Value, 0, 0);
End-For;
End-Function;
Function build_Report
&FileName = "ERRORS.XLS";
&FileName = "\TEMP\" | &FileName;
&Z_XML_XLS = GetFile(GetFileName("ZZ_XML_CNV", ZZ_CNV_AET.PROCESS_INSTANCE.Value, "errors", "xls", ""), "w", "a", %FilePath_Absolute);
xml_init_file(0, 0, 0, 0, 0, 0, 0, 0);
BUILD_XML_STYLES("ZZ_XML_CNV");
xml_init_worksheet("Results", 0, 0);
build_header();
ROWSET_TO_CELLS("ZZ_XML_CNV", &cnv_stg, 4);
xml_finalize_worksheet_split(1, 0, 1, "");
xml_finalize_worksheet_pagesetup("Landscape", "", 0.75, 0.25, 0.75, 0.25, "", "");
xml_finalize_worksheet_print(1, 1000, 0, 75, 0);
xml_finalize_workbook();
End-Function;
&hide_flds = CreateRowset(Record.ZZ_HIDE_FIELDS);
&hide_flds.Fill("WHERE TEMPLATE_ID = :1", ZZ_CNV_AET.TEMPLATE_ID);
&rpt_flds = CreateRowset(Record.ZZ_RPT_FIELDS);
&rpt_flds.Fill("WHERE TEMPLATE_ID = :1", ZZ_CNV_AET.TEMPLATE_ID);
&rpt_flds.Sort(ZZ_RPT_FIELDS.FIELDNUM, "A");
For &D = &cnv_stg.ActiveRowCount To 1 Step - 1
If &cnv_stg(&D).GetRecord(1).ZZ_PROCESS_IND.Value = "C" Then
&cnv_stg.DeleteRow(&D);
Else
For &flds = 1 To &hide_flds.ActiveRowCount
&FieldName = "Field." | &hide_flds(&flds).ZZ_HIDE_FIELDS.FIELDNAME.Value;
&cnv_stg(&D).GetRecord(1).GetField(@&FieldName).Visible = False;
End-For;
End-If;
End-For;
build_Report();
To utilize this code you first need define your work record that you will be using to generate the rowset in the application engine. The only requirement for this work record is that it contain the fields, ZZ_ROW_STYLE and HEIGHT, I usually include these two fields at front of the record as the ROWSET_TO_CELLS function has a Start with parameter that accounts for these two work fields to being in Column 1 and 2. Also, if you want to include other work fields within your rowset, then include them to the front of the record and adjust the start parameter to not include these fields on your spreadsheet. The example code above will use the Long Name from the work record as column headers.
Example Work Record:

After you have identified what columns are included in your spreadsheet you need to create excel styles and associate them to the ZZ_ROW_STYLE within your work record. This allows the process to associate what styles are used for Character, Date and number fields within your rowset.
First build the excel styles used by your spreadsheet, the excel styles component allows you to define styles and reuse them in multiple spreadsheets and can be found in the File Conversion utility project.

Once you have gotten to this point you are ready to call the code in the beginning of this post to generate spreadsheet reports with multiple tabs and functions! Also, if you want to generate a report with multiple tabs and the data in almost the same as the other tabs. Then only create one work record and hide the fields on the rowset that you don't want to print to the report for the current worksheet you are generating. If you use this technique you will need to loop through the rowset hiding every instance of this field so it won't print.
And this is how I generate xls in PeopleSoft.
Enjoy!
If you have downloaded the project and installed it in a development environment then check out the Report Step under the Main Section. This is the step that generates the errors in a spreadsheet. Below is the code:
Declare Function GetFileName PeopleCode ZZ_INTFC_FUNCLB.FILENAME FieldFormula;
Declare Function xml_init_file PeopleCode ZZ_XMLLINK.XMLFILE FieldFormula;
Declare Function xml_init_style PeopleCode ZZ_XMLLINK.XMLFILE FieldFormula;
Declare Function xml_init_worksheet PeopleCode ZZ_XMLLINK.XMLFILE FieldFormula;
Declare Function xml_init_col PeopleCode ZZ_XMLLINK.XMLFILE FieldFormula;
Declare Function xml_init_row PeopleCode ZZ_XMLLINK.XMLFILE FieldFormula;
Declare Function xml_cell_char PeopleCode ZZ_XMLLINK.XMLFILE FieldFormula;
Declare Function xml_format_header_or_footer PeopleCode ZZ_XMLLINK.XMLFILE FieldFormula;
Declare Function xml_finalize_worksheet_pagesetup PeopleCode ZZ_XMLLINK.XMLFILE FieldFormula;
Declare Function xml_finalize_worksheet_print PeopleCode ZZ_XMLLINK.XMLFILE FieldFormula;
Declare Function xml_finalize_worksheet_split PeopleCode ZZ_XMLLINK.XMLFILE FieldFormula;
Declare Function xml_finalize_worksheet_allowoptions PeopleCode ZZ_XMLLINK.XMLFILE FieldFormula;
Declare Function xml_finalize_workbook PeopleCode ZZ_XMLLINK.XMLFILE FieldFormula;
Declare Function BUILD_XML_STYLES PeopleCode ZZ_XMLLINK.XMLFILE FieldFormula;
Declare Function ROWSET_TO_CELLS PeopleCode ZZ_XMLLINK.XMLFILE FieldFormula;
Global string &HTMLstring;
Global File &Z_XML_XLS;
Local Record &TAO, &PER_DATA;
Global Rowset &cnv_stg;
Local Rowset &hide_flds, &rpt_flds;
Local SQL &getdata;
Function build_header()
Local number &COL;
&COL = 0;
For &flds = 1 To &rpt_flds.ActiveRowCount
xml_init_col((&COL = &COL + 1), 0, 78.25, 0, 0);
End-For;
xml_init_row(1, 0, 50, 0, "S1");
For &flds = 1 To &rpt_flds.ActiveRowCount
xml_cell_char(&rpt_flds(&flds).ZZ_RPT_FIELDS.FIELDNAME.Value, 0, 0);
End-For;
End-Function;
Function build_Report
&FileName = "ERRORS.XLS";
&FileName = "\TEMP\" | &FileName;
&Z_XML_XLS = GetFile(GetFileName("ZZ_XML_CNV", ZZ_CNV_AET.PROCESS_INSTANCE.Value, "errors", "xls", ""), "w", "a", %FilePath_Absolute);
xml_init_file(0, 0, 0, 0, 0, 0, 0, 0);
BUILD_XML_STYLES("ZZ_XML_CNV");
xml_init_worksheet("Results", 0, 0);
build_header();
ROWSET_TO_CELLS("ZZ_XML_CNV", &cnv_stg, 4);
xml_finalize_worksheet_split(1, 0, 1, "");
xml_finalize_worksheet_pagesetup("Landscape", "", 0.75, 0.25, 0.75, 0.25, "", "");
xml_finalize_worksheet_print(1, 1000, 0, 75, 0);
xml_finalize_workbook();
End-Function;
&hide_flds = CreateRowset(Record.ZZ_HIDE_FIELDS);
&hide_flds.Fill("WHERE TEMPLATE_ID = :1", ZZ_CNV_AET.TEMPLATE_ID);
&rpt_flds = CreateRowset(Record.ZZ_RPT_FIELDS);
&rpt_flds.Fill("WHERE TEMPLATE_ID = :1", ZZ_CNV_AET.TEMPLATE_ID);
&rpt_flds.Sort(ZZ_RPT_FIELDS.FIELDNUM, "A");
For &D = &cnv_stg.ActiveRowCount To 1 Step - 1
If &cnv_stg(&D).GetRecord(1).ZZ_PROCESS_IND.Value = "C" Then
&cnv_stg.DeleteRow(&D);
Else
For &flds = 1 To &hide_flds.ActiveRowCount
&FieldName = "Field." | &hide_flds(&flds).ZZ_HIDE_FIELDS.FIELDNAME.Value;
&cnv_stg(&D).GetRecord(1).GetField(@&FieldName).Visible = False;
End-For;
End-If;
End-For;
build_Report();
To utilize this code you first need define your work record that you will be using to generate the rowset in the application engine. The only requirement for this work record is that it contain the fields, ZZ_ROW_STYLE and HEIGHT, I usually include these two fields at front of the record as the ROWSET_TO_CELLS function has a Start with parameter that accounts for these two work fields to being in Column 1 and 2. Also, if you want to include other work fields within your rowset, then include them to the front of the record and adjust the start parameter to not include these fields on your spreadsheet. The example code above will use the Long Name from the work record as column headers.
Example Work Record:

After you have identified what columns are included in your spreadsheet you need to create excel styles and associate them to the ZZ_ROW_STYLE within your work record. This allows the process to associate what styles are used for Character, Date and number fields within your rowset.
First build the excel styles used by your spreadsheet, the excel styles component allows you to define styles and reuse them in multiple spreadsheets and can be found in the File Conversion utility project.
Excel Styles
Use this Componet to create your Excel Styles.
 |
| Excel Style |
Process Styles Tab 1
Use this component to associate your styles to your Report you are generating. All styles used by your report must be added to the report process name.
Row Styles
Use this page in the Process Styles to associate the styles to a row style and then the field types to an excel style. This will associate all date fields within the row to the DT1 style. You can associate multiple row styles to one Process Name, since you might have a scenario where you are representing one style on one row, but on the next you need a different style for that same row. For instance, if you were generating a spreadsheet that had outstanding balances by Vendor for AP and you wanted to include a Total Row where all the totals were summed and shown in Bold, Then you would need another row style for this total row where your numbers were bold. The Override Style allows you to select one to many fields within your rowset and override the style by qualifying the FIELDNAME:STYLE. Then you can add multiple overrides as long as you separate them by a semicolon.
Once you have gotten to this point you are ready to call the code in the beginning of this post to generate spreadsheet reports with multiple tabs and functions! Also, if you want to generate a report with multiple tabs and the data in almost the same as the other tabs. Then only create one work record and hide the fields on the rowset that you don't want to print to the report for the current worksheet you are generating. If you use this technique you will need to loop through the rowset hiding every instance of this field so it won't print.
And this is how I generate xls in PeopleSoft.
Enjoy!
Force Search Processing on Component
Currently we are building our first PeopleSoft workcenter for a third party recruiting system. We elected to utilize PeopleSoft for building and approving the requisition, since PeopleSoft houses all the characteristics of the new requisition in the Position Data record and AWE gives us the ability to quickly implement complex workflows, with minimal effort! Within the workcenter design is where I came across a design issue that I had never encountered in my PeopleSoft career. What I had done for the Manager's is build them a workcenter where all the Positions that report directly or indirectly to them are stored in a jQuery Tree. I covered this in my first ever blog posting last year.
This is what the WorkCenter Page looks like:

This design allows the manager to Drill down to any positions within their organization and begin the recruiting process for that position. Once they select a Position that they want to recruit for the requisition is populated from the Position Data record and the manager is one click away from staring the requisitions approval process.
After the Requisition is selected by manager.

This is where we need to add some row level security, to the Requisition Component. Since one of the requirements is that any manager can delegate to any employee, all employee's must have access to the Component and savvy Peoplesoft User's know that if you populate the URL with a querystring that includes the Key, the component will bypass search processing and allow the user access to the requisition that they might not otherwise be authorized to see. So I began researching on how to prevent the component from using this querystring. That is when I found this option on the Component Properties.
After I clicked this option, I could always intercept the request in SearchInit PeopleCode and populate the search keys from the Cache Record Populated when the Manager selects the position in the workcenter page. Below is the SearchInit PeopleCode:
Global string &GLB_POSN_NBR, &GLB_BR_GUID;
Local Record &ZZ_CACHE;
If %Component = Component.ZZ_REQUISITIONS Then
/*Hide emplid and name so user can not search*/
&GLB_BR_GUID = %Request.GetParameter("GUID");
Hide(ZZ_REQUISITIONS.ZZ_JOB_OPENING_ID);
If None(&GLB_BR_GUID) Then
ZZ_REQUISITIONS.MANAGER_ID = %EmployeeId;
Else
&ZZ_CACHE = CreateRecord(Record.ZZ_BR_CACHE);
&ZZ_CACHE.GUID.Value = &GLB_BR_GUID;
&ZZ_CACHE.SelectByKey();
&GLB_POSN_NBR = &ZZ_CACHE.POSITION_NBR.Value;
ZZ_REQUISITIONS.ZZ_JOB_OPENING_ID.Value = &ZZ_CACHE.ZZ_JOB_OPENING_ID.Value;
End-If;
/* skip search page */
SetSearchDialogBehavior(0);
End-If;
Very cool that Oracle allows you to force Search Processing at the Component Level!
This is what the WorkCenter Page looks like:

This design allows the manager to Drill down to any positions within their organization and begin the recruiting process for that position. Once they select a Position that they want to recruit for the requisition is populated from the Position Data record and the manager is one click away from staring the requisitions approval process.
After the Requisition is selected by manager.

This is where we need to add some row level security, to the Requisition Component. Since one of the requirements is that any manager can delegate to any employee, all employee's must have access to the Component and savvy Peoplesoft User's know that if you populate the URL with a querystring that includes the Key, the component will bypass search processing and allow the user access to the requisition that they might not otherwise be authorized to see. So I began researching on how to prevent the component from using this querystring. That is when I found this option on the Component Properties.

After I clicked this option, I could always intercept the request in SearchInit PeopleCode and populate the search keys from the Cache Record Populated when the Manager selects the position in the workcenter page. Below is the SearchInit PeopleCode:
Global string &GLB_POSN_NBR, &GLB_BR_GUID;
Local Record &ZZ_CACHE;
If %Component = Component.ZZ_REQUISITIONS Then
/*Hide emplid and name so user can not search*/
&GLB_BR_GUID = %Request.GetParameter("GUID");
Hide(ZZ_REQUISITIONS.ZZ_JOB_OPENING_ID);
If None(&GLB_BR_GUID) Then
ZZ_REQUISITIONS.MANAGER_ID = %EmployeeId;
Else
&ZZ_CACHE = CreateRecord(Record.ZZ_BR_CACHE);
&ZZ_CACHE.GUID.Value = &GLB_BR_GUID;
&ZZ_CACHE.SelectByKey();
&GLB_POSN_NBR = &ZZ_CACHE.POSITION_NBR.Value;
ZZ_REQUISITIONS.ZZ_JOB_OPENING_ID.Value = &ZZ_CACHE.ZZ_JOB_OPENING_ID.Value;
End-If;
/* skip search page */
SetSearchDialogBehavior(0);
End-If;
Very cool that Oracle allows you to force Search Processing at the Component Level!
Subscribe to:
Posts (Atom)